Most beginner video editors make the same mistakes: poor audio, overused effects, wrong export settings, and weak storytelling flow. These editing errors can make even good footage look unprofessional. The good news? Most video editing mistakes are easy to fix once you understand the right workflow.
In this guide, you’ll learn the most common video editing mistakes beginners make in 2026, practical ways to avoid them, and a step-by-step editing workflow that improves quality, speed, and storytelling.
Signs Your Video Editing Needs Improvement
Not sure whether your editing quality is improving? Here are common signs your workflow needs work:
- Your videos feel too long or boring
- Audio sounds uneven or unclear
- Colors look different between scenes
- Transitions feel distracting
- Exported videos appear blurry
- Viewers drop off quickly
- Videos don’t match platform format requirements
If you notice multiple issues from this list, it may be time to improve your editing workflow and avoid common beginner mistakes.
Top 10 Common Video Editing Mistakes Beginners Make in 2026
The most common video editing mistakes include poor file organization, bad audio quality, excessive transitions, incorrect export settings, inconsistent color correction, poor pacing, wrong aspect ratios, skipping review, and weak storytelling. These mistakes often make videos look unprofessional and reduce viewer engagement.
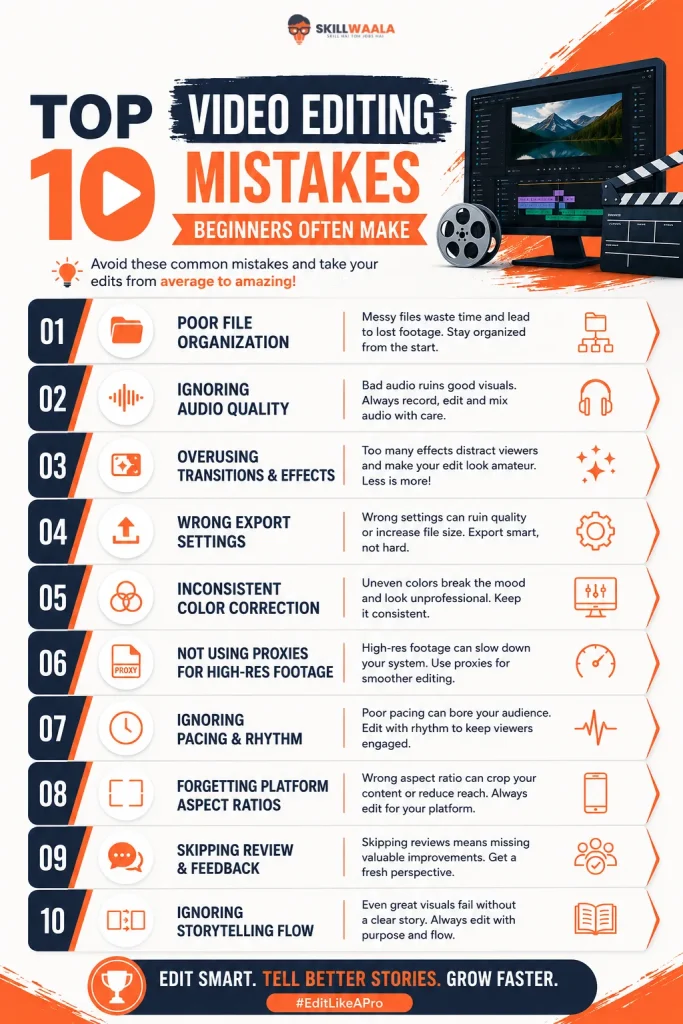
Poor file organization
It is often seen that beginners dump all the footage, music, and project files in one folder. This eventually leads to confusion and missing clips, which slows the workflow. If one wants to become a professional editor, they should follow a structured folder setup like Footage, Audio, Exports, and Project Files. Following this prevents video editing mistakes that waste time during revisions or collaborations.
Ignoring audio quality
Another beginner editing error is focusing more on visuals and neglecting clean sound. Poor audio instantly makes even great visuals feel unprofessional. Hence, it’s advisable to always use proper mics, reduce the background noise, and balance levels to fix such video editing problems early..
Overusing Transitions & Effects
There is no denying that beginners often get excited about the wide variety of transitions and effects available in editing software. But when the results come, all we see are excessive cuts, spins, or flashes, one of the most common video editing mistakes that distract from storytelling.
A good editor will usually use simple cuts, fades, or dissolves and leave fancy transitions for key moments. Keep transitions minimal and purposeful to avoid falling into this classic beginner editing error trap. Avoid this beginner editing problem by using minimal transitions that serve the story instead of distracting from it.
Wrong Export Settings
Beginners often ignore export settings, leading to blurry or pixelated videos. If you’ve ever wondered why my video looks bad after export, it’s usually because of mismatched settings or an incorrect bitrate. Common beginner editing errors include mismatched resolution, frame rate, or codec.
Always match your export settings to the platform’s requirements and avoid export mistakes with the right formats. If you’ve ever wondered why my video looks bad after export, it’s likely due to wrong codec or frame rate settings.
Ensure you prevent export mistakes with the right formats to keep your video crisp and professional.
Inconsistent Color Correction
Another thing that beginners often skip is proper color correction. This is one of the most frustrating beginner editing problems, often leading to dull or uneven visuals. They also apply random LUTs without balancing the footage, which leads to shots looking completely mismatched, one being too warm and the other too cool.
The right approach will always start with color correction, which includes exposure, contrast, and white balance, followed by applying color grading. Keeping a consistent tone will help you maintain your video’s visual continuity and mood. To fix uneven colors and create cinematic looks, start with color correction before applying any creative LUTs. This helps solve beginner editing problems related to inconsistency.
Not Using Proxies for High-Res Footage
Direct editing 4K or RAW footage can make your system lag and slow the editing drastically. Proxies can be of great help here; they are low-resolution copies of that footage, which makes the editing very smooth. Once the editing process is done, the proxies will automatically link back to the high-res files for the export.
Using the proxies will save you a lot of time, reduce frustrations, and keep your workflow efficient, especially when you are working on low-end PCs.
Ignoring Pacing & Rhythm
Every video needs a natural rhythm, whether a vlog or an ad. Beginners often make the mistake of keeping the clips too short or too long. Good pacing keeps the viewers engaged, while poor pacing makes the video feel too draggy and chaotic. Matching cuts to the music beats or any emotional moment can elevate the storytelling. You can always watch professional videos and study how they maintain precise flow and timings.
Forgetting Platform Aspect Ratios
Each platform, like YouTube, Instagram, and TikTok, has different aspect ratio requirements. Hence, uploading a horizontal video on a vertical platform or vice versa ruins the composition and visibility. Always plan the aspect ratio in advance: 16:9 is for YouTube, 9:16 is for Reels and Shorts, and 1:1 is for Squire feed. Use the correct ratio to enhance your audience’s experience and prevent cropping or black bars.
Skipping Review & Feedback
Most editors export once and consider it done without checking for errors. It is highly advisable to review your video at least twice, once for technical issues like cuts, audio sync, and color, and once for the storytelling part. Get feedback from your peers or mentors, which will help you see what you might have missed.
Reviewing your video helps you spot common editing issues like sync errors or awkward cuts early on. Revision is part of professional editing, and small changes here and there can massively improve the quality of your product.
Ignoring Storytelling Flow
Editing is not just about cutting the clips; it’s more about building a story, even if it’s a short video. Beginners can sometimes focus too much on the effects and transitions, forgetting the emotional or logical flow. Before finalizing your content piece, ask yourself, “Does this edit make any sense?” “Does it connect one scene to another smoothly?” Keeping a clear beginning, middle, and end makes even the simplest videos impactful and memorable.
Read More – Free Video Editing Software
How to build a mistake-proof workflow?
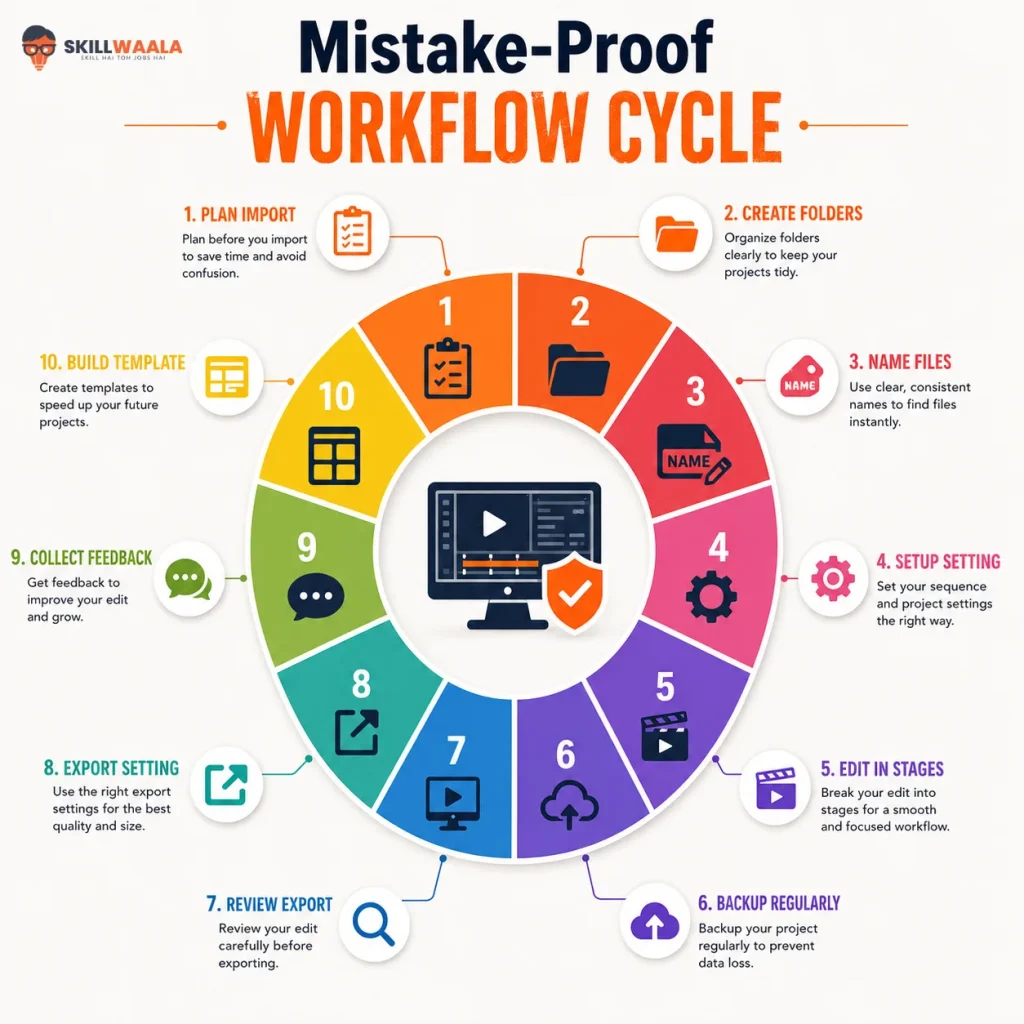
This section focuses on preventing post-production errors and improving your overall editing process:
Step 1: Plan Before You Import
Before starting your project, understand the goal, tone, and target platform. Then, create a shot list or storyboard to determine what footage you will use. Then it’s time to decide your video format, for example, vertical for Reels and horizontal for YouTube. Prepare everything in advance, as pre-planning minimizes any confusion that might come later in the editing phase.
Step 2: Create a Folder Structure
Set up organized folders before importing the footage, audio, music, graphics, project files, and exports. Label folders and subfolders; ignoring them becomes a hectic process to resolve later. Consistent structure prevents the scenario of lost files and saves tons of time during revisions.
Step 3: Use File Naming Conventions
Rename the clips logically and maintain consistency in naming across all the assets. One example is Interview01_CamA. Use this instead of naming your files like MOV_1234. This makes it easier to find, replace, or reconnect the files later.
Step 4: Set Up Sequence and Project Settings Correctly
Match the sequence settings to the original footage and decide the aspect ratio based on your platform. Avoid any loss in quality or black borders caused by the mismatched settings. Additionally, double-check your export settings to ensure the final video maintains the optimal quality. It’s also helpful to preview your project on the intended platform or device to catch any issues before final rendering.
Step 5: Edit in Stages
Break the whole process into clear parts, starting from the:
The Rough Cut: Arrange the main clips for story flow in this part.
- Fine Cut: Now add transitions, b-roll, and pacing.
- Polish: Lastly, apply effects, color correction, and audio balancing
Avoid multitasking across stages, as it reduces mistakes and helps maintain focus on each task’s details. Concentrating on one stage at a time can improve efficiency and the quality of work. This approach minimizes errors and ensures better overall results.
Step 6: Backup Regularly
Consider using cloud storage or external devices for project backups. You can also save multiple project versions, such as Project_V1, V2, and V3. This step prevents major losses if the software crashes or the files get corrupted. Regularly updating your backups ensures that you always have the most recent project files available in case of emergencies. Additionally, organizing your backups systematically makes it easier to locate specific versions when needed.
Step 7: Review Before Export
Before exporting the final cut, watch the full edit with fresh eyes or take a short break before reviewing it. This process allows you to disconnect from it for a moment and review the file from a new perspective, increasing your chance of catching errors. Also, check for any typos, jump cuts, audio issues, or color mismatches. Ensure the captions and music levels flow naturally along with the transitions.
Step 8: Export with the Right Settings
Export the files based on the platform where your video will be uploaded, like YouTube or Instagram. Maintain the correct resolution, bitrate, and codec to balance quality and file size. Also consider using platform presets like YouTube 1080p whenever possible. Additionally, ensure that the audio settings are compatible with the platform’s requirements to avoid playback issues. Double-check the file format and naming to ensure smooth uploading and accessibility. Properly optimized files will enhance viewer experience and engagement.
Step 9: Collect Feedback
Feedback is critical at this stage. To get genuine feedback, share a draft version of your file with your teammates or mentors. Note all the repeated suggestions; they usually point to genuine issues that arise frequently. Refining the content based on external eyes will give you a better result than refining the content by yourself.
Step 10: Build Your Personal Workflow Template
In the final step, once you know what works best for you, document it. Create reusable templates for folder structure, project setup, and export presets. With time, this will become an efficient personal editing system. Review and update your templates regularly to adapt to new workflows or tools. This ongoing process ensures your system remains optimized and effective as your skills grow.
If you’re new to editing, learn the correct workflow from start to finish to avoid unnecessary confusion.
Read More – Video Editing Skills
Beginner vs Professional Video Editing Workflow
The difference between beginner and professional video editors is not always about expensive software or advanced effects; it mostly comes down to workflow and editing habits. Beginners often make avoidable mistakes like poor file management, overusing transitions, ignoring audio quality, or skipping final reviews. Professional editors, on the other hand, follow a structured editing process that improves speed, consistency, and overall video quality. The comparison below highlights how beginner editing habits differ from professional workflows and what you can improve to edit more efficiently.
| Beginner Workflow | Professional Workflow |
|---|---|
| Random file storage | Organized folders |
| Too many transitions | Minimal transitions |
| Ignores audio | Prioritizes audio quality |
| Exports without checking | Reviews before export |
| Focuses only on effects | Focuses on storytelling |
| No backups | Multiple backups |
Want to Improve Your Video Editing Skills?
Avoiding mistakes is only the first step. Learn video editing basics, storytelling, transitions, color correction, audio balancing, and practical editing techniques through SkillWaala’s free video editing training.
Explore Free Video Editing CourseChecklist Summary
This checklist is designed to help you identify common editing issues and learn how to fix video editing problems before your final export, and can serve as a quick reference guide for anyone pursuing an online video editing course to master the editing discipline.
Pre-Editing Preparation
- Have you clearly defined your project goal and audience?
- Is your folder structure organized (Footage, Audio, Graphics, etc.)?
- Are all your clips renamed properly and sorted by type or scene?
Project Setup
- Are your sequence settings (resolution, frame rate, aspect ratio) correctly matched to your footage?
- Have you created proxies for high-resolution clips to avoid lag while editing?
- Is your timeline clean and free of duplicate or unused clips?
Audio & Visual Balance
- Is your audio clear, balanced, and noise-free?
- Have you checked that the background music isn’t overpowering dialogue?
- Are your color corrections consistent across all scenes?
Storytelling & Flow
- Does the video maintain a consistent rhythm and pacing?
- Are transitions used only where necessary, not excessively?
- Does the story or message feel smooth from start to finish?
Technical Accuracy
- Have you checked your export settings (format, resolution, bitrate) for the platform?
- Are your aspect ratios correct for the target platform (YouTube 16:9, Instagram Reel 9:16, etc.)?
- Is the final export free of black frames, glitches, or muted sections?
Review & Feedback
- Have you watched the full video at least once before finalizing?
- Did you seek feedback from at least one other person?
- Are you satisfied that the final version meets the project’s goal and tone?
Backup & Archive
- Have you saved a backup of your final project files and exported the video?
- Did you archive all related assets for future reference or edits?
- Is your project ready to be deleted from the active workspace to save storage?
Pro Editor Tip
Many beginner editors spend too much time experimenting with transitions and effects while ignoring pacing and audio quality. In real-world editing projects, clean cuts, balanced sound, and strong storytelling matter far more than flashy effects. A simple edit with good rhythm usually performs better than an over-edited video.

Conclusion
The best editors might not be perfect in their work, but they learn fast. Great editors aren’t born perfect; they master editing, troubleshooting, and learn from every project they complete. Review this checklist after every project, and you will eventually realize that your workflow feels smoother, cleaner, and more professional.
Keep experimenting and never fear getting feedback, as it will only sharpen your skills with time. Embracing continuous improvement is the key to becoming a truly skilled editor. Whether you’re learning through a free video editing course or an advanced online program, focusing on these fundamentals will help you grow faster as an editor.
FAQs
Using a low bitrate or mismatched resolution can create this kind of situation. One should export using the H.264 codec at 15–25 Mbps for 1080p.
Keep the audio levels at around -6 dB and avoid overlapping the background music with dialogue.
No, it’s not always necessary, but basic color correction ensures a consistent look. It helps maintain visual coherence across different shots and lighting conditions.
Use proxy files or lower playback resolution inside your editor, which can help improve performance and make editing smoother.
Ignoring storytelling is the biggest mistake that beginners make. They forget that the editing is not limited to cuts and transitions, but it’s the story that brings the true nature of the content to life.
Poor file organization, ignoring audio quality, overusing transitions & effects, wrong export settings, inconsistent color correction, not using proxies for high-res footage, ignoring pacing and rhythm, forgetting platform aspect ratios, skipping review & feedback, and ignoring storytelling flow are some of the most common video editing mistakes.
Ensure your footage isn’t underexposed and export it using a higher bitrate and the right codec, such as H.264 or H.265. You can also apply mild noise reduction in your editing software before exporting the final content.
Either your clips were shot under different lighting, or you applied the LUTs very unevenly. Remember to start with color correction before grading to maintain uniformity.
Before exporting, check that your project settings match the export resolution, frame rate, and aspect ratio. Also, review the audio levels and color grading, and ensure no missing clips or glitches.